
- June 09, 2023 Key Component Verification
- June 18, 2023 3D Print Verification
- July 1, 2023 The First Prototype (MVP)
- July 5,2023 Product Reliability Testing of Ice Pressing
- August 2, 2023 The Second Prototype with Design
- September 20, 2023 Ice Inserts Designing, Manufacturing and Inspiration
- October 12, 2023 The Modification of Second Prototype (Milestone)
- November 15th, 2023 Industrial Design plug in
- Dec 15, 2023 GLAZER Press Processing
- January 17th, 2024 Product Proofing
- May 16th, 2024 Reliability Test for Final GLAZER Press #1: Especially for Shipping
- June 27, 2024 A brief introduction for the born of GLAZER Press
Key Component Verification
Behind every great innovation lies a story woven from countless details, tests, and decisions. For our project on heated ice press with interchangeable inserts, this narrative begins with meticulously selecting and validating its core component—the heating module. This initial step is crucial for ensuring the product's success. This blog post delves into the verification process we undertook to prepare for the MVP, ensuring the reliability and practicality of our core technology and how this process has laid a solid foundation for further development.
Heating Module Selection and Testing
In the project's early stages, to mitigate the risks associated with product development, our primary challenge was selecting a technology that could heat ice quickly while ensuring the heating process was safe and uniform. This decision-making process involved extensive market research and technical comparisons, eventually narrowing our focus to several potential heating technologies.
We formed a dedicated technical team to conduct in-depth tests on these technologies. Each was rigorously evaluated on a small-scale prototype we built, with test parameters including heating efficiency, energy consumption, safety, and user convenience. Through repeated experiments and data analysis, we chose a solution that provided rapid and uniform heating.


See, it works with the heating method. This progress encourages us a lot for the further R&D.
Wiring Design Decisions: Internal vs. External
After the heating module's testing and selection phase, we faced another critical question in design: how to arrange the product's wiring in a way that was both aesthetic and operational? We considered two main wiring methods: internal and external. If we go with the outside way, we will choose a flat wire that may connect to both sides of the ice mold and limit the position between the two molds. But can reduce the size of this ice press. If we go with the inside method, the size of this ice press will be more prominent, and the upper mold will not be removed. In exchange, the product’s integration is enhanced.
One afternoon, we gathered, each sharing our thoughts in front of a whiteboard. Some team members favored internal wiring, believing it offered better wire protection and maintained the ice press's integrity. Others argued that separating the top and bottom parts of the ice press would facilitate cleaning and insert changes despite external wiring's potentially lesser aesthetic appeal.
After thorough team discussions and multiple experimental validations, we decided on external wiring. This decision was based on long-term use and maintenance convenience, and we designed a solution that protected the wires without significantly impacting the product's appearance.

Furthermore, we discussed about the necessity of physical switches, water tanks, and different locking mechanisms.
Our heated ice press project has successfully taken its first step through careful verification of key components and design decisions. The key component verification process validated our technological choices and provided a solid foundation for further product development and optimization, offering valuable data support and lessons learned. We will adhere to this rigorous development approach as the project progresses, ensuring our product meets market needs and delivers an exceptional user experience.
This is just the beginning of our innovation journey. In future blog posts, we will share more about the challenges, solutions, and stories from our team’s product development process. Thank you for your interest and support. Let’s look forward to and witness the birth of this revolutionary product together!
3D Print Verification
Turning theory into tangible reality is a pivotal step on the path of innovation. For our Heated Ice Press with Interchangeable Inserts project, we use 3D printing to make our first design come alive. It brings our designs to life quickly and vividly and serves as an efficient, cost-effective tool for verification. This means that we can test the feasibility of the design, identify potential problems, and optimize accordingly before formal production. This blog post shares how we transform our ideas from the digital realm into physical prototypes, significantly impacting our project.
Enclosing Design Challenges and Solutions
One major design challenge was creating an aesthetically pleasing and functional enclosure. Our design team meticulously planned the enclosure's shape and size to protect the internal mechanics while adhering to modern aesthetics. With 3D printing, we could rapidly prototype the enclosure, facilitating immediate evaluation and iterations based on feedback, such as comfort in handling and aesthetic appeal.


The ice insert represents an innovative aspect of our product. Initially focusing on a classic spherical insert for testing, the design process tested our creativity and technical solutions, ensuring the inserts could quickly be filled, removed, and remain stable during heating and pressing. Prototyping these inserts was crucial in meeting our high standards.
The First Prototype (MVP)
Creating the first prototype marks a pivotal turning point in the innovation journey, transitioning our concepts and designs from paper to the physical world. For our Heated Ice Press with Interchangeable Inserts project, this stage was not just about realizing our technical and design philosophies for the first time; it was a testament to teamwork, innovation, and problem-solving. This blog post shares our experiences, challenges, and solutions in creating the first prototype, taking our dream one step closer to reality.
Conceptualization
Remember the Blog in Key Component Verification? We are continuously using the method we verified to guide the MVP prototype.

Everything started with a simple idea: to create a heated ice press that could quickly make ice while allowing for easy insert changes. Numerous discussions, designs, and plans later, we are going to make it.
Design Challenges and Solutions
Transforming the concept into a manufacturable design presented multiple challenges. Ensuring the efficiency and safety of the heating module, designing an aesthetically pleasing yet functional exterior, and achieving quick insert changes were among the hurdles we faced. Collaborative efforts between our designers and engineers led to innovative solutions that overcame these obstacles.

Prototype Development Process
After 3D Printing Verification, we began assembling the initial prototype. This intricate process involved Machinism designing, PCB designing, and initial software programming and debugging, among other steps. Precision and strict quality control were paramount to meet our high standards at every stage. In the end, we achieved our goal as scheduled.


The creation is a significant achievement, symbolizing an essential step from concept to reality and showcasing our team's resilience in facing challenges. This process brought us closer to success, bolstering our confidence in the product and laying a solid foundation for future development and optimization.
In the next blog post, we will test the assembled principle prototype to verify its performance stability. We know that more problems will be exposed during this process, and we are confident to face and solve them. Let's look forward to the first run of the prototype together.
Product Reliability Testing of Ice Pressing
So far, we are done with the first prototype design and have made it mainly with 3D printing. Here in this blog, I will show you the systematic reliability testing with it. This phase is crucial for any product development, validating our design and technical choices and providing invaluable firsthand data to guide further optimization. See the testing phase of this version of the prototype and the lessons we learned.
Product Feature Test
After completing the prototype, we entered an intense and hopeful testing phase. The primary goal was to verify the product's core features: ice inserts change, heating efficiency, and the quality of sculpted ice. Each aspect underwent detailed testing and evaluation. During the test, we encountered challenges and found issues not considered in the design, such as the ice getting stuck and not forming smoothly on the first attempt. Additionally, it is not so convenient for users to change inserts in this version. Moreover, the amount of meltwater is too much to design a water tank to collect it, etc.
Find shortcomings and fix them. During the reliability test, we fixed most of the problems exposed. And we will fix all of them surely.


Optimization and Iteration
Faced with these issues, our team saw an opportunity for improvement. Engineers quickly explored the causes and solutions, leading to new design proposals like adjusting the heating module and optimizing the layout. The design team also proposed several improvements to ease insert change, including optimizing the magnetic attachment mechanism for more straightforward operation.

This process of optimization and iteration is continuous and necessary. Each iteration brings us closer to our ideal product, providing direction for improvements. Through teamwork, we gradually resolved the issues within the prototype, laying a solid foundation for the next development phase.
The development and testing of the first prototype were challenging but invaluable experiences. They validated our design and technical choices and revealed potential issues in the product development process, offering directions for optimization and improvement. As we move forward, these experiences and lessons will become our most valuable assets, guiding us to pursue perfection and create innovative products that truly meet user needs.
Stay tuned for more stories about product development, including design optimization, manufacturing preparations, and the journey to market launch. Thank you for your attention and support. We look forward to sharing more updates and hearing your thoughts and suggestions! This process of optimization and iteration is continuous and necessary. Each iteration brings us closer to our ideal product, providing direction for improvements. Through teamwork, we gradually resolved the issues within the prototype, laying a solid foundation for the next development phase.
The Second Prototype with Design
As our project progresses, our designers get started on industrial design. Our second prototype's design reflects technical advancements and our deep consideration of product appearance and user experience.
Compared to the last prototype, the second, still a 3D printed model and not operational, marks a significant design breakthrough, making the product concept more straightforward and appealing. This blog takes you through the design innovation process of it.
From Concept to Visual Representation
In the early design stages, our goal was to convey the product's core ideas and features while ensuring its appearance attracted our target audience, opting for a more modern design language to reflect the product's efficiency and ease of use.
The second prototype features several design innovations:
- Exterior Design:We combined ergonomic design and verified the handle size through 3D printing models. Considering the portability of the product. Also, we designed a locking buckle for users to increase portability and adapt to various scenarios.

3D print model - Color and Material: In terms of color selection, we have proposed a black and gold color scheme, which makes the product more visually impactful and high-end. Regarding material, we used aluminum alloy with a golden color coating for the heating part due to its good thermal conductivity and ease of processing (as shown in the image below). For other parts, we plan to use plastic with injection molding. I admit this will reduce the product's texture, but we now chose to compromise for its cheaper price.

Design Thinking for User Experience
Throughout the design process of the second prototype, we prioritized user experience. Although the model wasn't operational, we optimized the design through simulated use scenarios and interactions and intuitively felt the design of the exterior design, ensuring every design is user-centric. We believe that even a static model can communicate a commitment to user experience through its design.

Future Outlook
This phase deepened our understanding of the target market and user needs and laid a solid foundation for further development. Next, we will optimize the design, combine technical research and development results, and gradually realize this design into a complete product. Let's look forward to the effect of our proofing together!
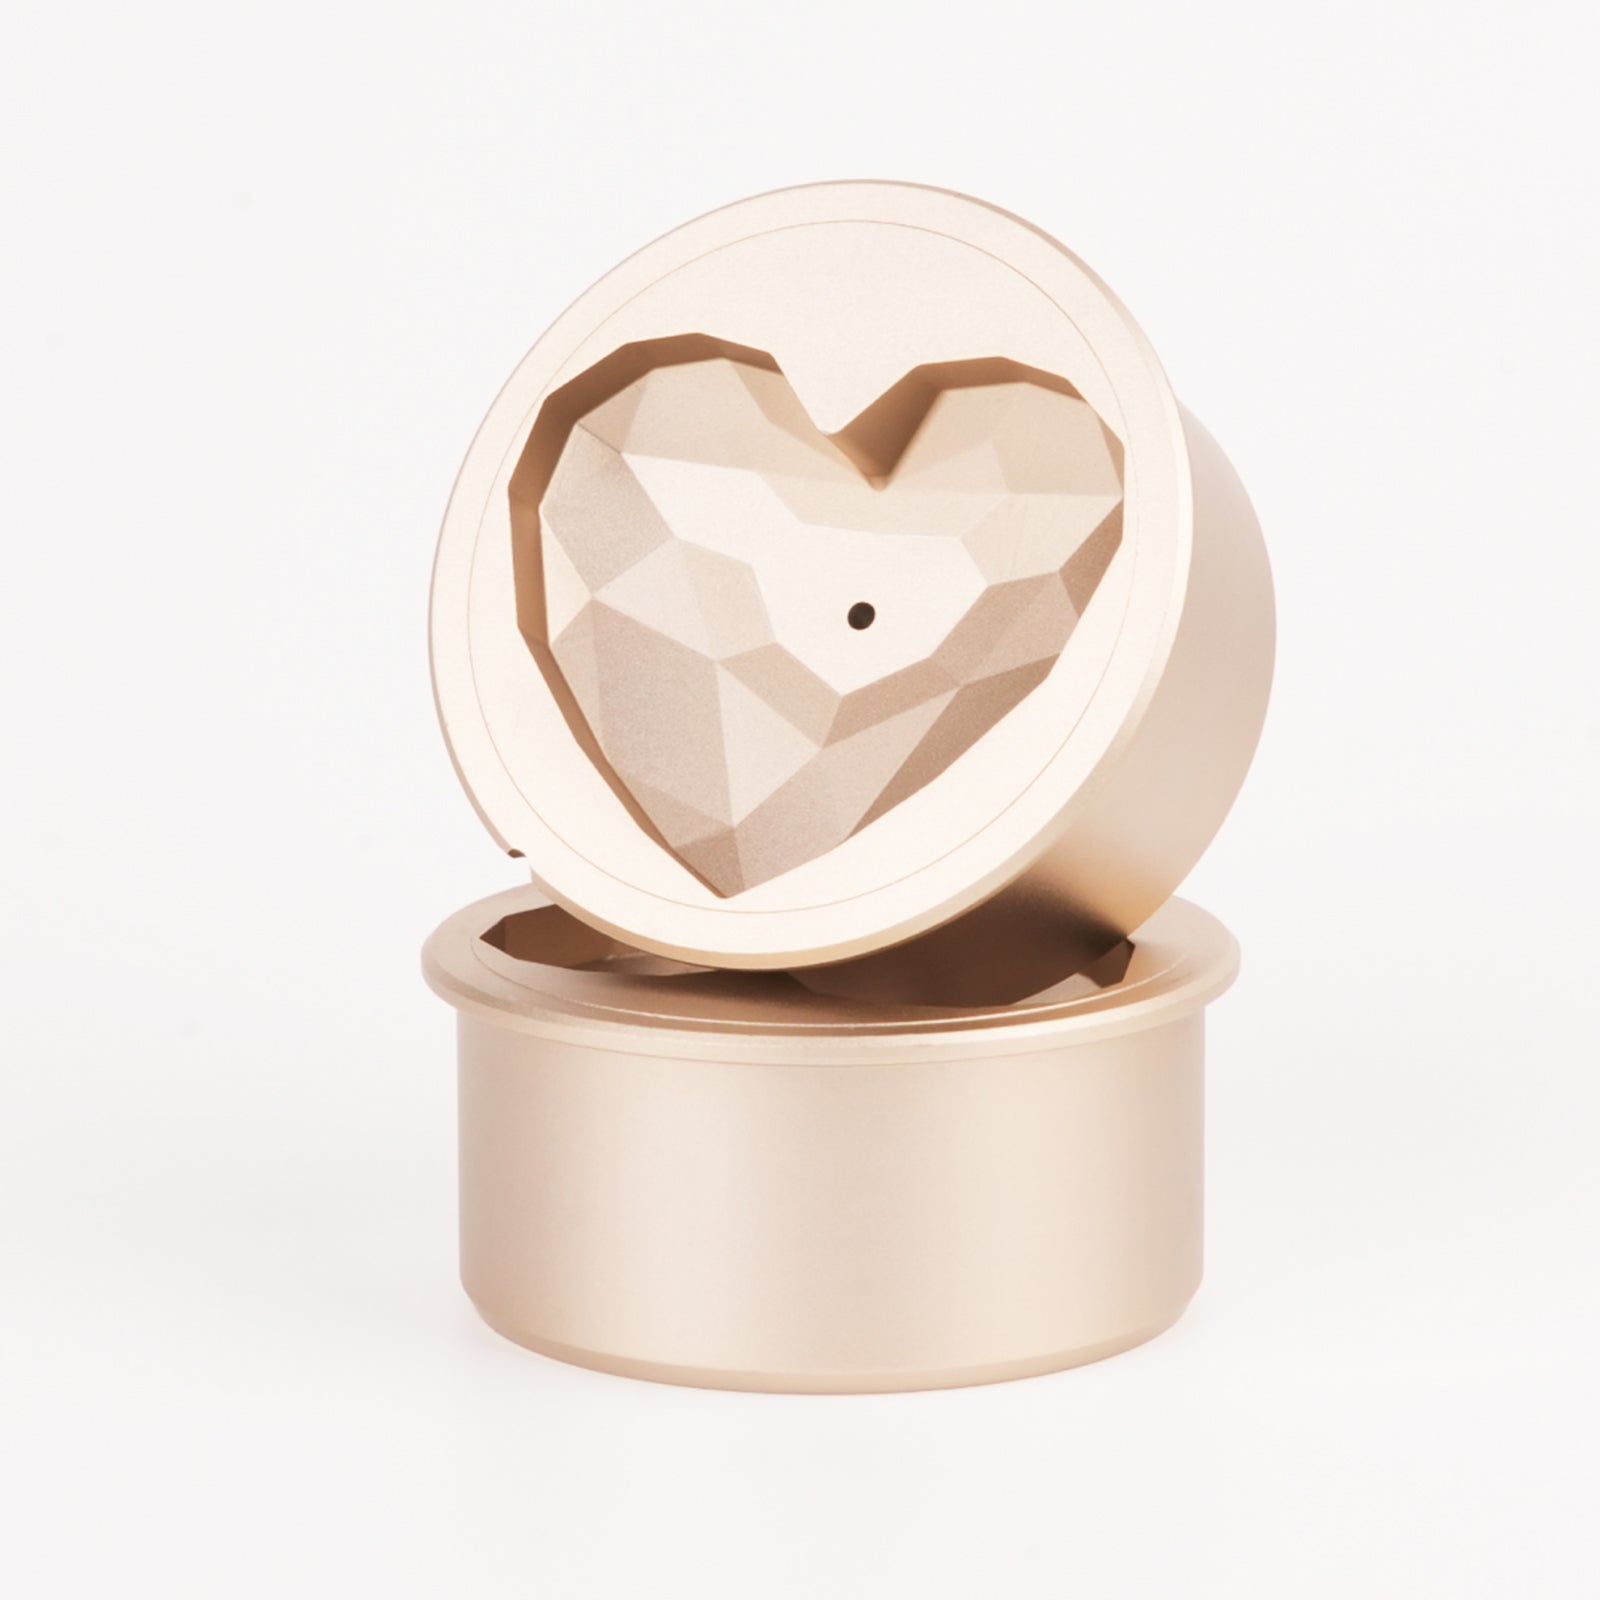
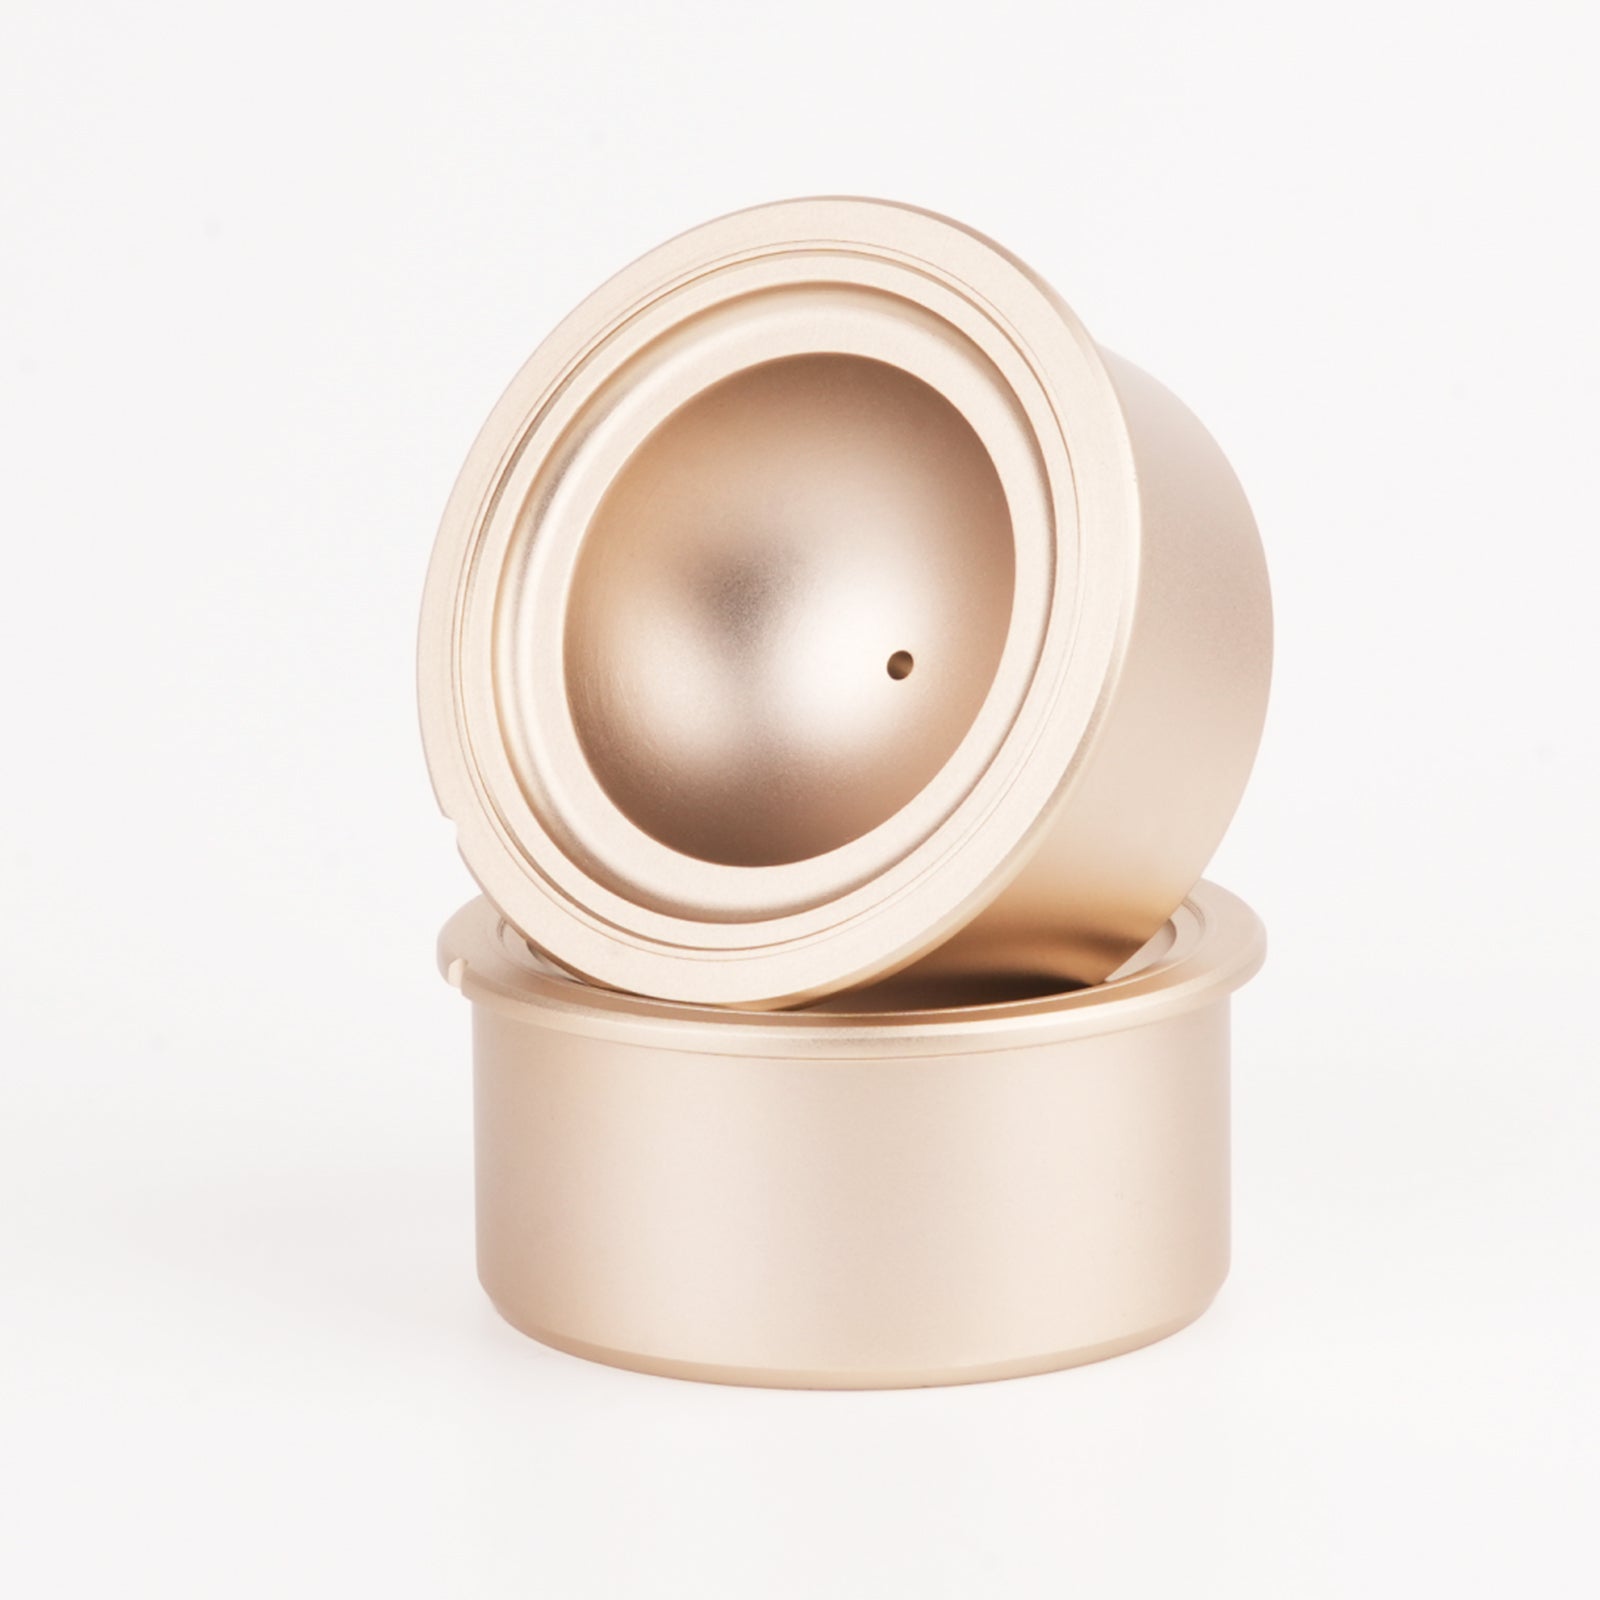
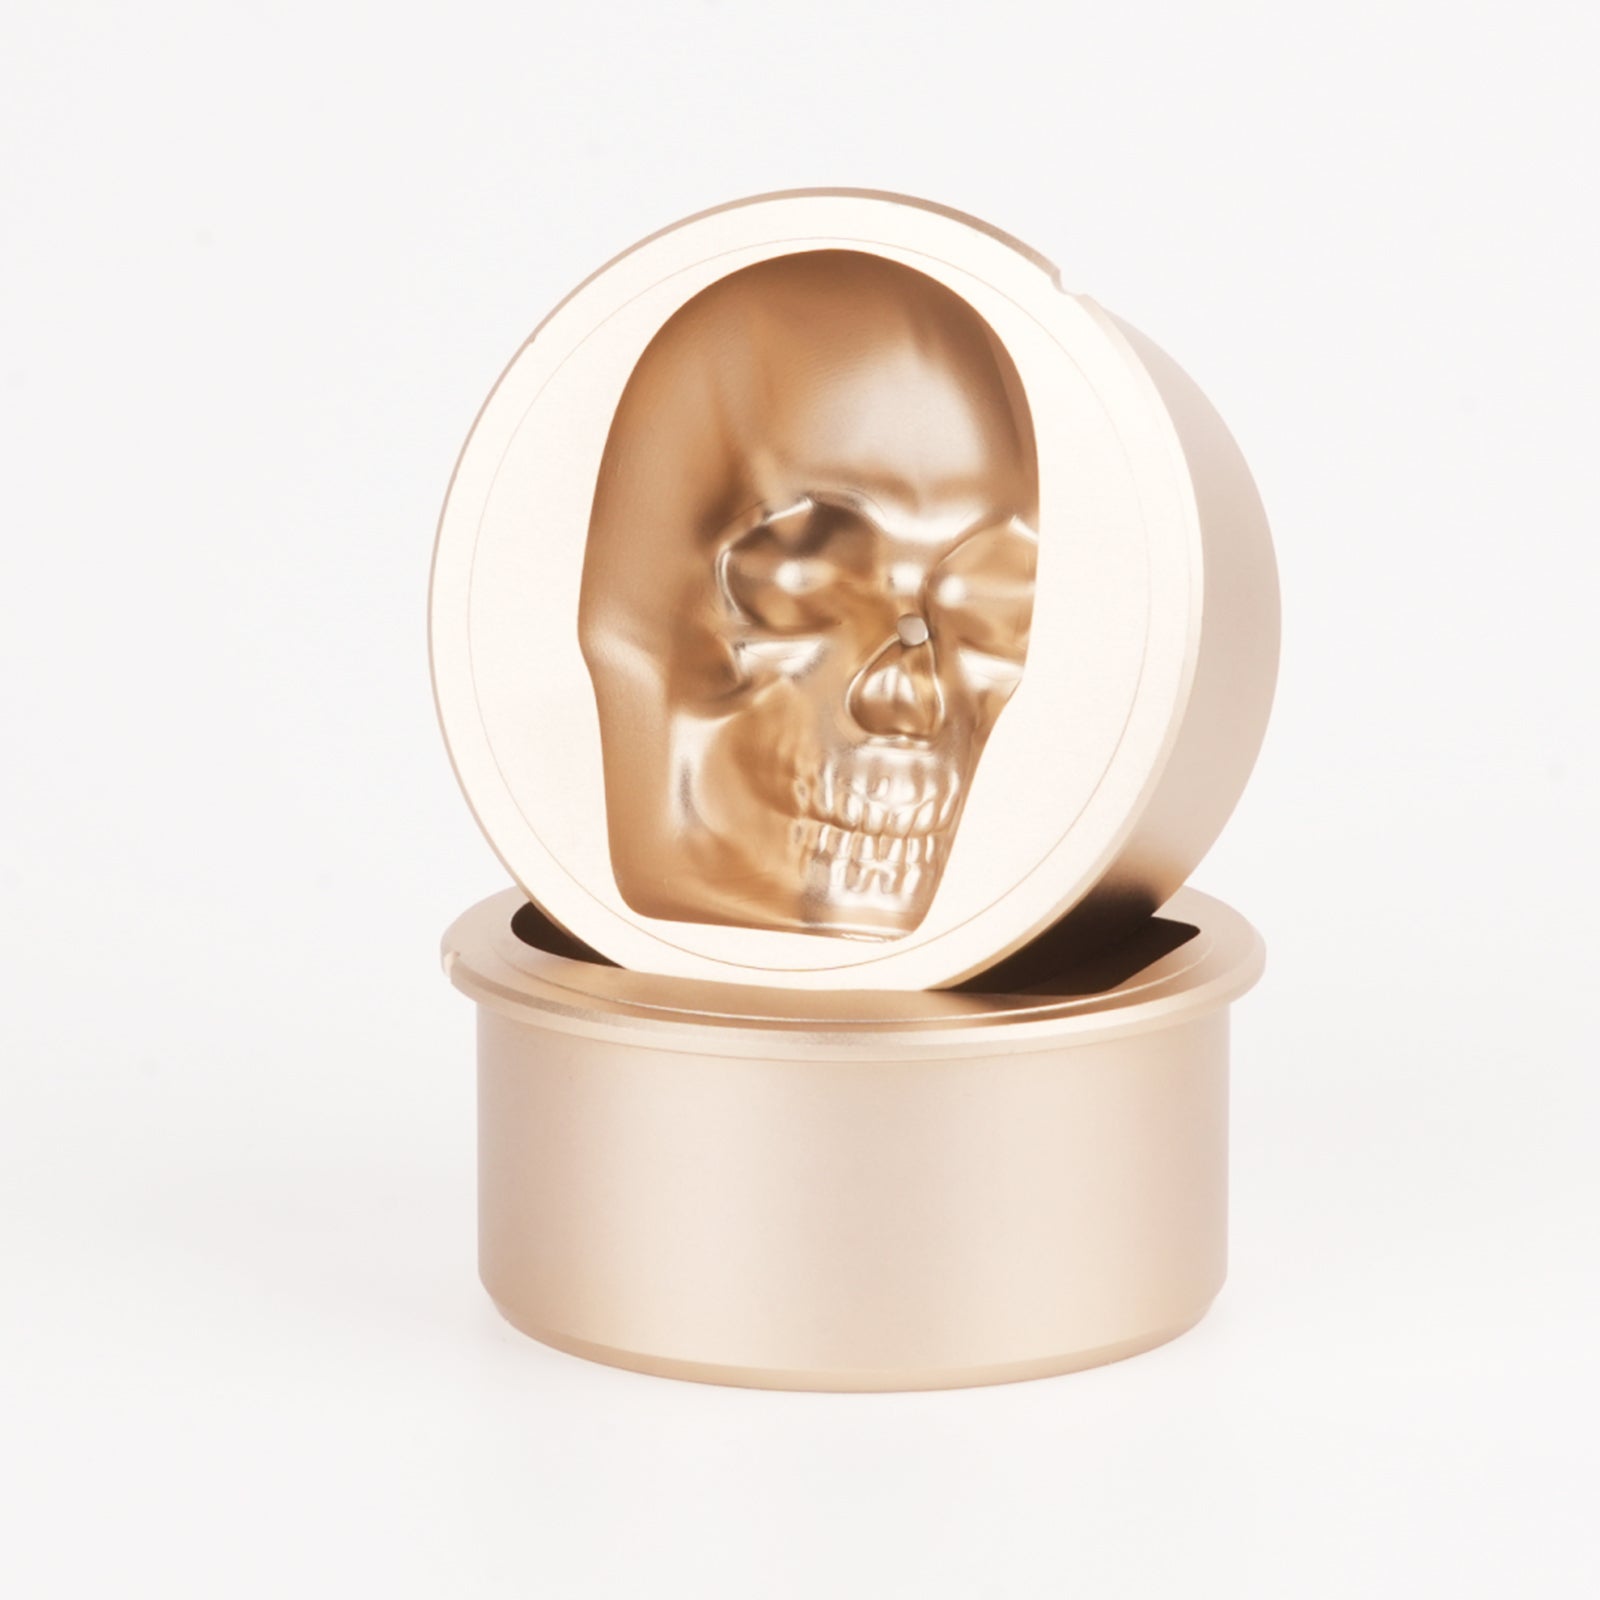
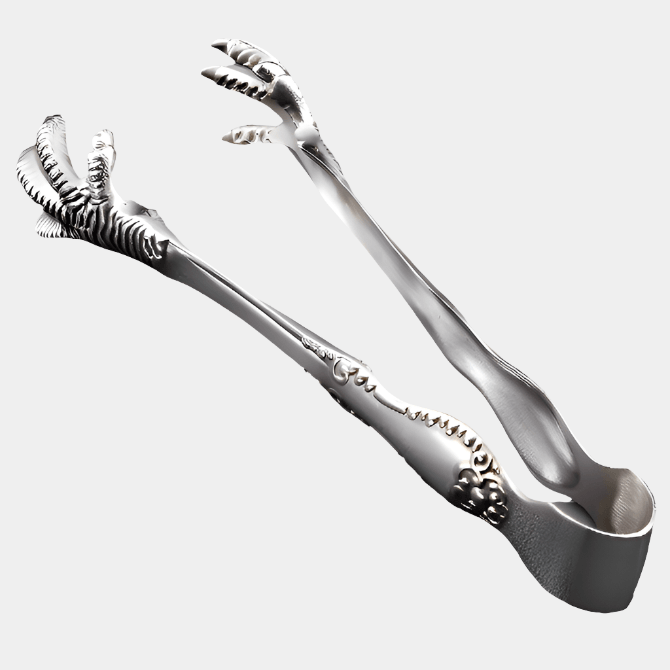
Ice Inserts Designing, Manufacturing and Inspiration
In the development of GLAZER Press, designing interchangeable inserts is not just a technical challenge but also a stage for creativity. This blog post delves into our insert design process, including the design thoughts behind different inserts, manufacturing methods, and our sources of inspiration.
Design Intention
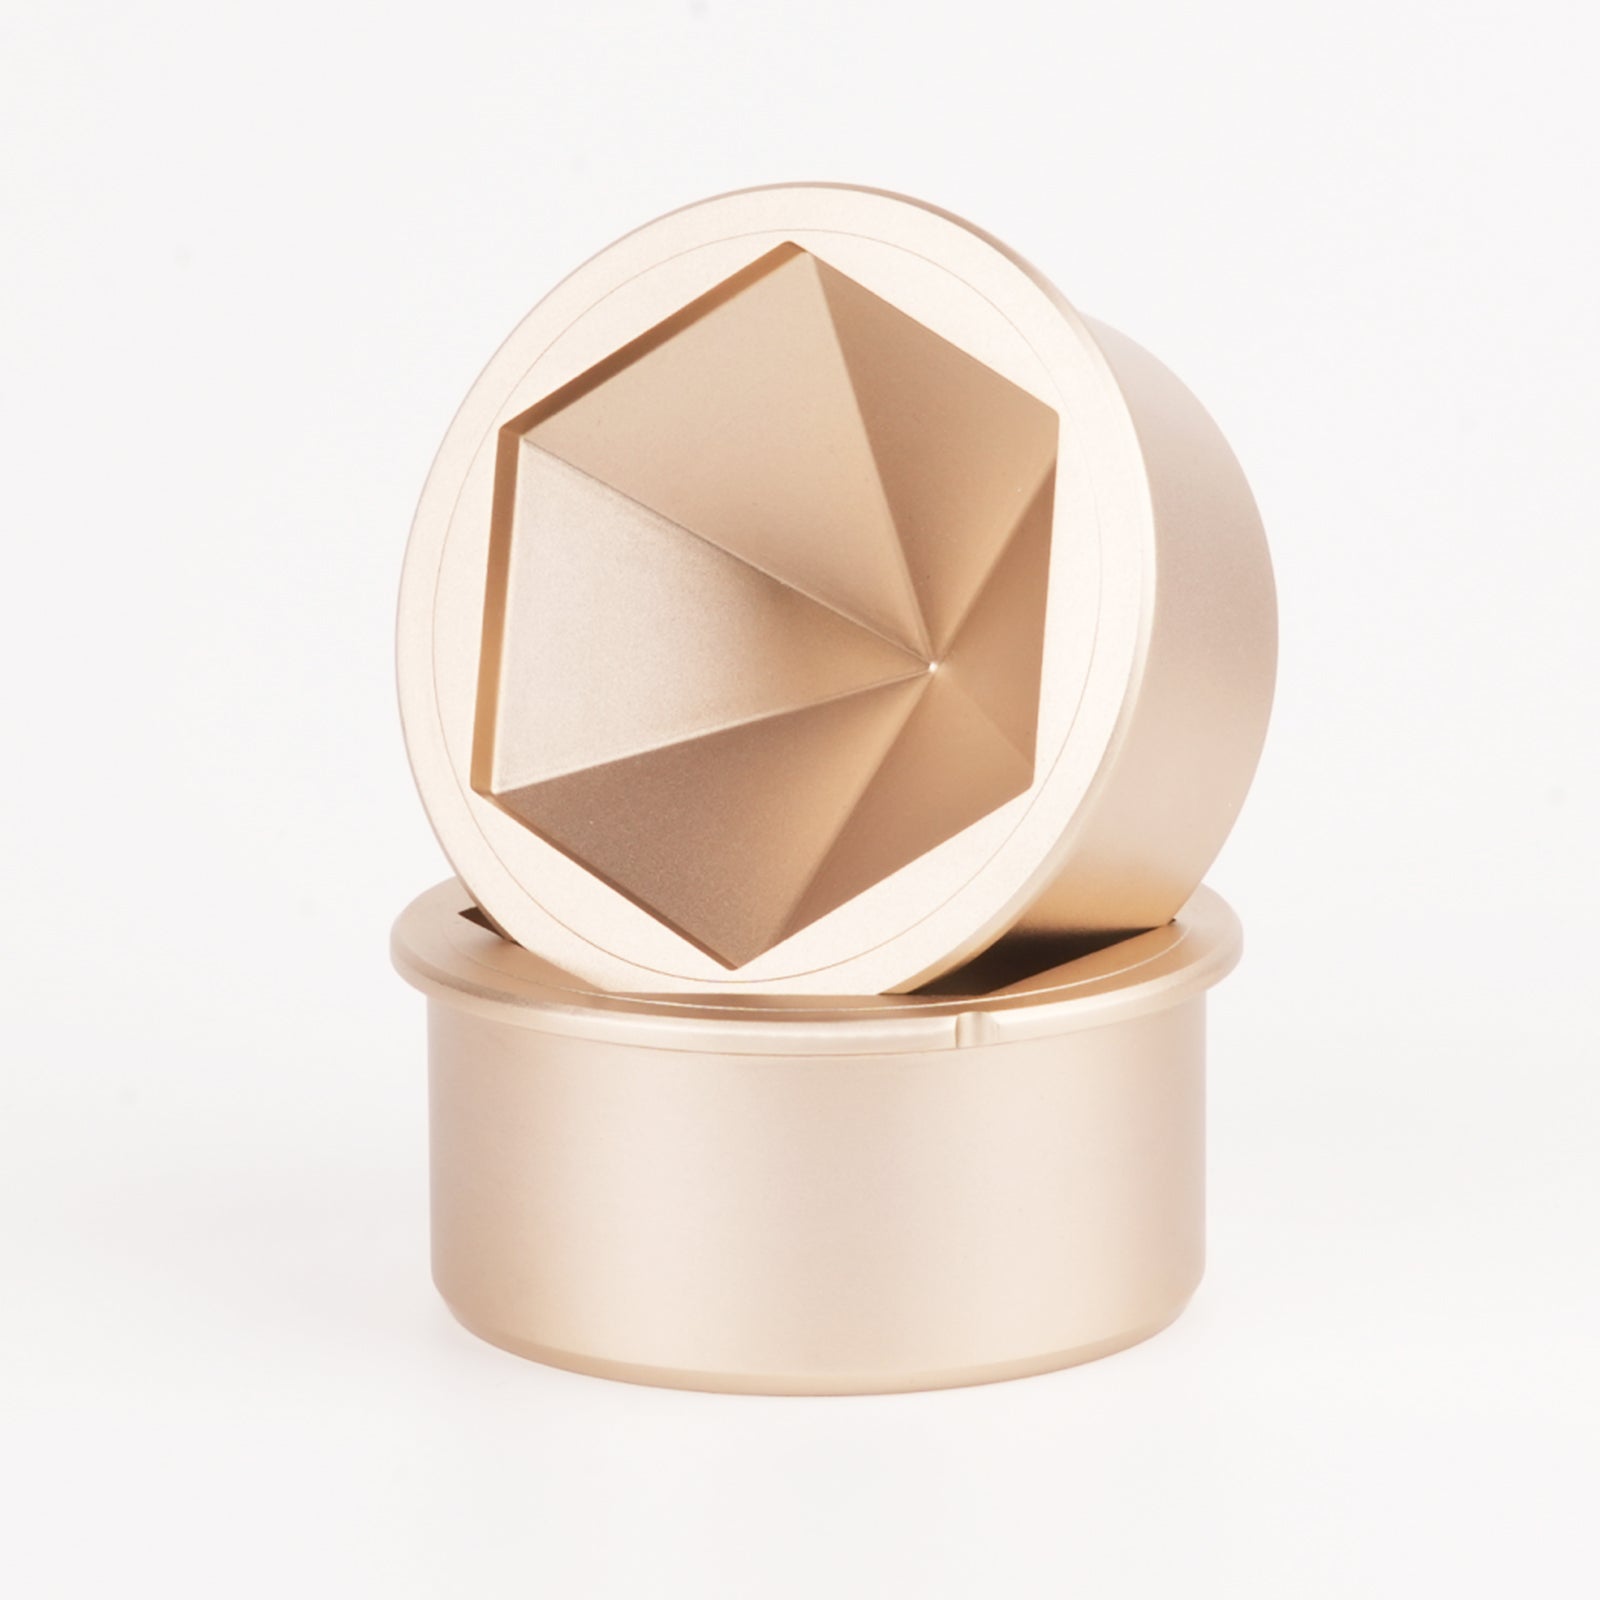
Our goal was to create an ice press that is powerful and easy to use and sparks users' creativity. We designed a series of inserts, allowing users to produce ice in various shapes for different needs and occasions. From classic spheres to complex organic shapes, each insert is intended to enhance the visual enjoyment and overall experience of beverages.
- Sphere inserts: As basic shapes, they meet everyday cooling needs, but we optimized their proportions and details to make the ice blocks more attractive and melt evenly.
- Other inserts: Inspired by modern design and natural elements, such as hearts and planets, which are aesthetically pleasing and create unique visual effects in beverages.
- Custom inserts: Considering users' desire for personalization, we are considering whether to offer custom mold services, allowing users to design unique inserts based on their interests or specific occasions.

ice inserts
Manufacturing and Technical Challenges
The manufacturing process of the insert is filled with technical challenges. Meanwhile, we used precise 3D printing technology to create ice models to test ice block quality.

Inspiration Sources
Our inspiration for insert designs is wide-ranging, from celestial bodies to disco lights at KTVs. The lines and shapes of modern architecture, as well as the techniques of abstract art, have provided rich inspiration for our mold designs. We also pay close attention to user feedback and suggestions, with many creative mold ideas originating from user needs and innovative thoughts.

Through continuous exploration and innovation, our interchangeable insert designs have added unique charm to the ice press machine project, enhancing product functionality and enriching user experience. We believe these designs are about making ice blocks and creating beauty and joy in users' lives. We will continue to explore more possibilities in the future.
The Modification of Second Prototype (Milestone)
Following the successful creation and testing of the first prototype, our team gained valuable feedback and experience, guiding the direction of our project. These insights and user feedback became the foundation for developing the second prototype. This blog post takes you through the birth process of the second prototype, exploring how we integrated design aesthetics and innovative details into the product while elevating the user experience to new heights.
Elevating Design Philosophy
At the onset of the second prototype's design, we set a core objective: to innovate technically and lead in design aesthetics. We chose a black and gold color scheme, a classic yet modern choice that highlights the product's premium quality and attracts consumer attention. Additionally, we incorporated more user-friendly details, such as practical handle designs, aiming to improve user convenience and overall experience.

Innovative Detailing
Details are vital to a product's success. In the second prototype, we deeply analyzed feedback from the prototype and made a series of improvements. For example, we optimized the insert-changing mechanism for ease and speed, enhanced the heating module's stability and efficiency to ensure consistent ice quality, and upgraded the body materials, improving durability and the product's overall aesthetic.


Prioritizing User Experience
User experience was a focal point in the development of the second prototype. Through user research and feedback, we continuously adjusted and optimized the design. Additionally, we introduced intelligent features, such as temperature control and timing functions, carefully designed based on user needs to provide a more convenient and personalized experience.
Here's an ice gem pressing video.
The emergence of the second prototype marks a significant advancement in our project. It reflects our technical innovation, pursuit, and, more importantly, our deep understanding of aesthetics and user experience. We believe this product will meet and exceed user expectations with ongoing efforts and optimization.
In future developments, we will continue to center on the user, exploring and innovating to create products that are not only technologically advanced but also superior in design and convenience.
Thank you for your attention and support. We look forward to bringing a new experience to the market with this product.
Industrial Design plug in
We are thrilled! The arrival of the third prototype has finally come.
The third prototype is an improvement made upon the second, integrating industrial design. The product's exterior design embodies aesthetics and serves as a crucial component of brand value and user experience. We specifically hired a seasoned designer to assist us in industrial exterior design. Through close collaboration with the designer, we underwent numerous design iterations to ensure that the final product presented to users had an excellent exterior design. We are delighted to share our new prototype's exterior design philosophy.

Continuation of the second prototype
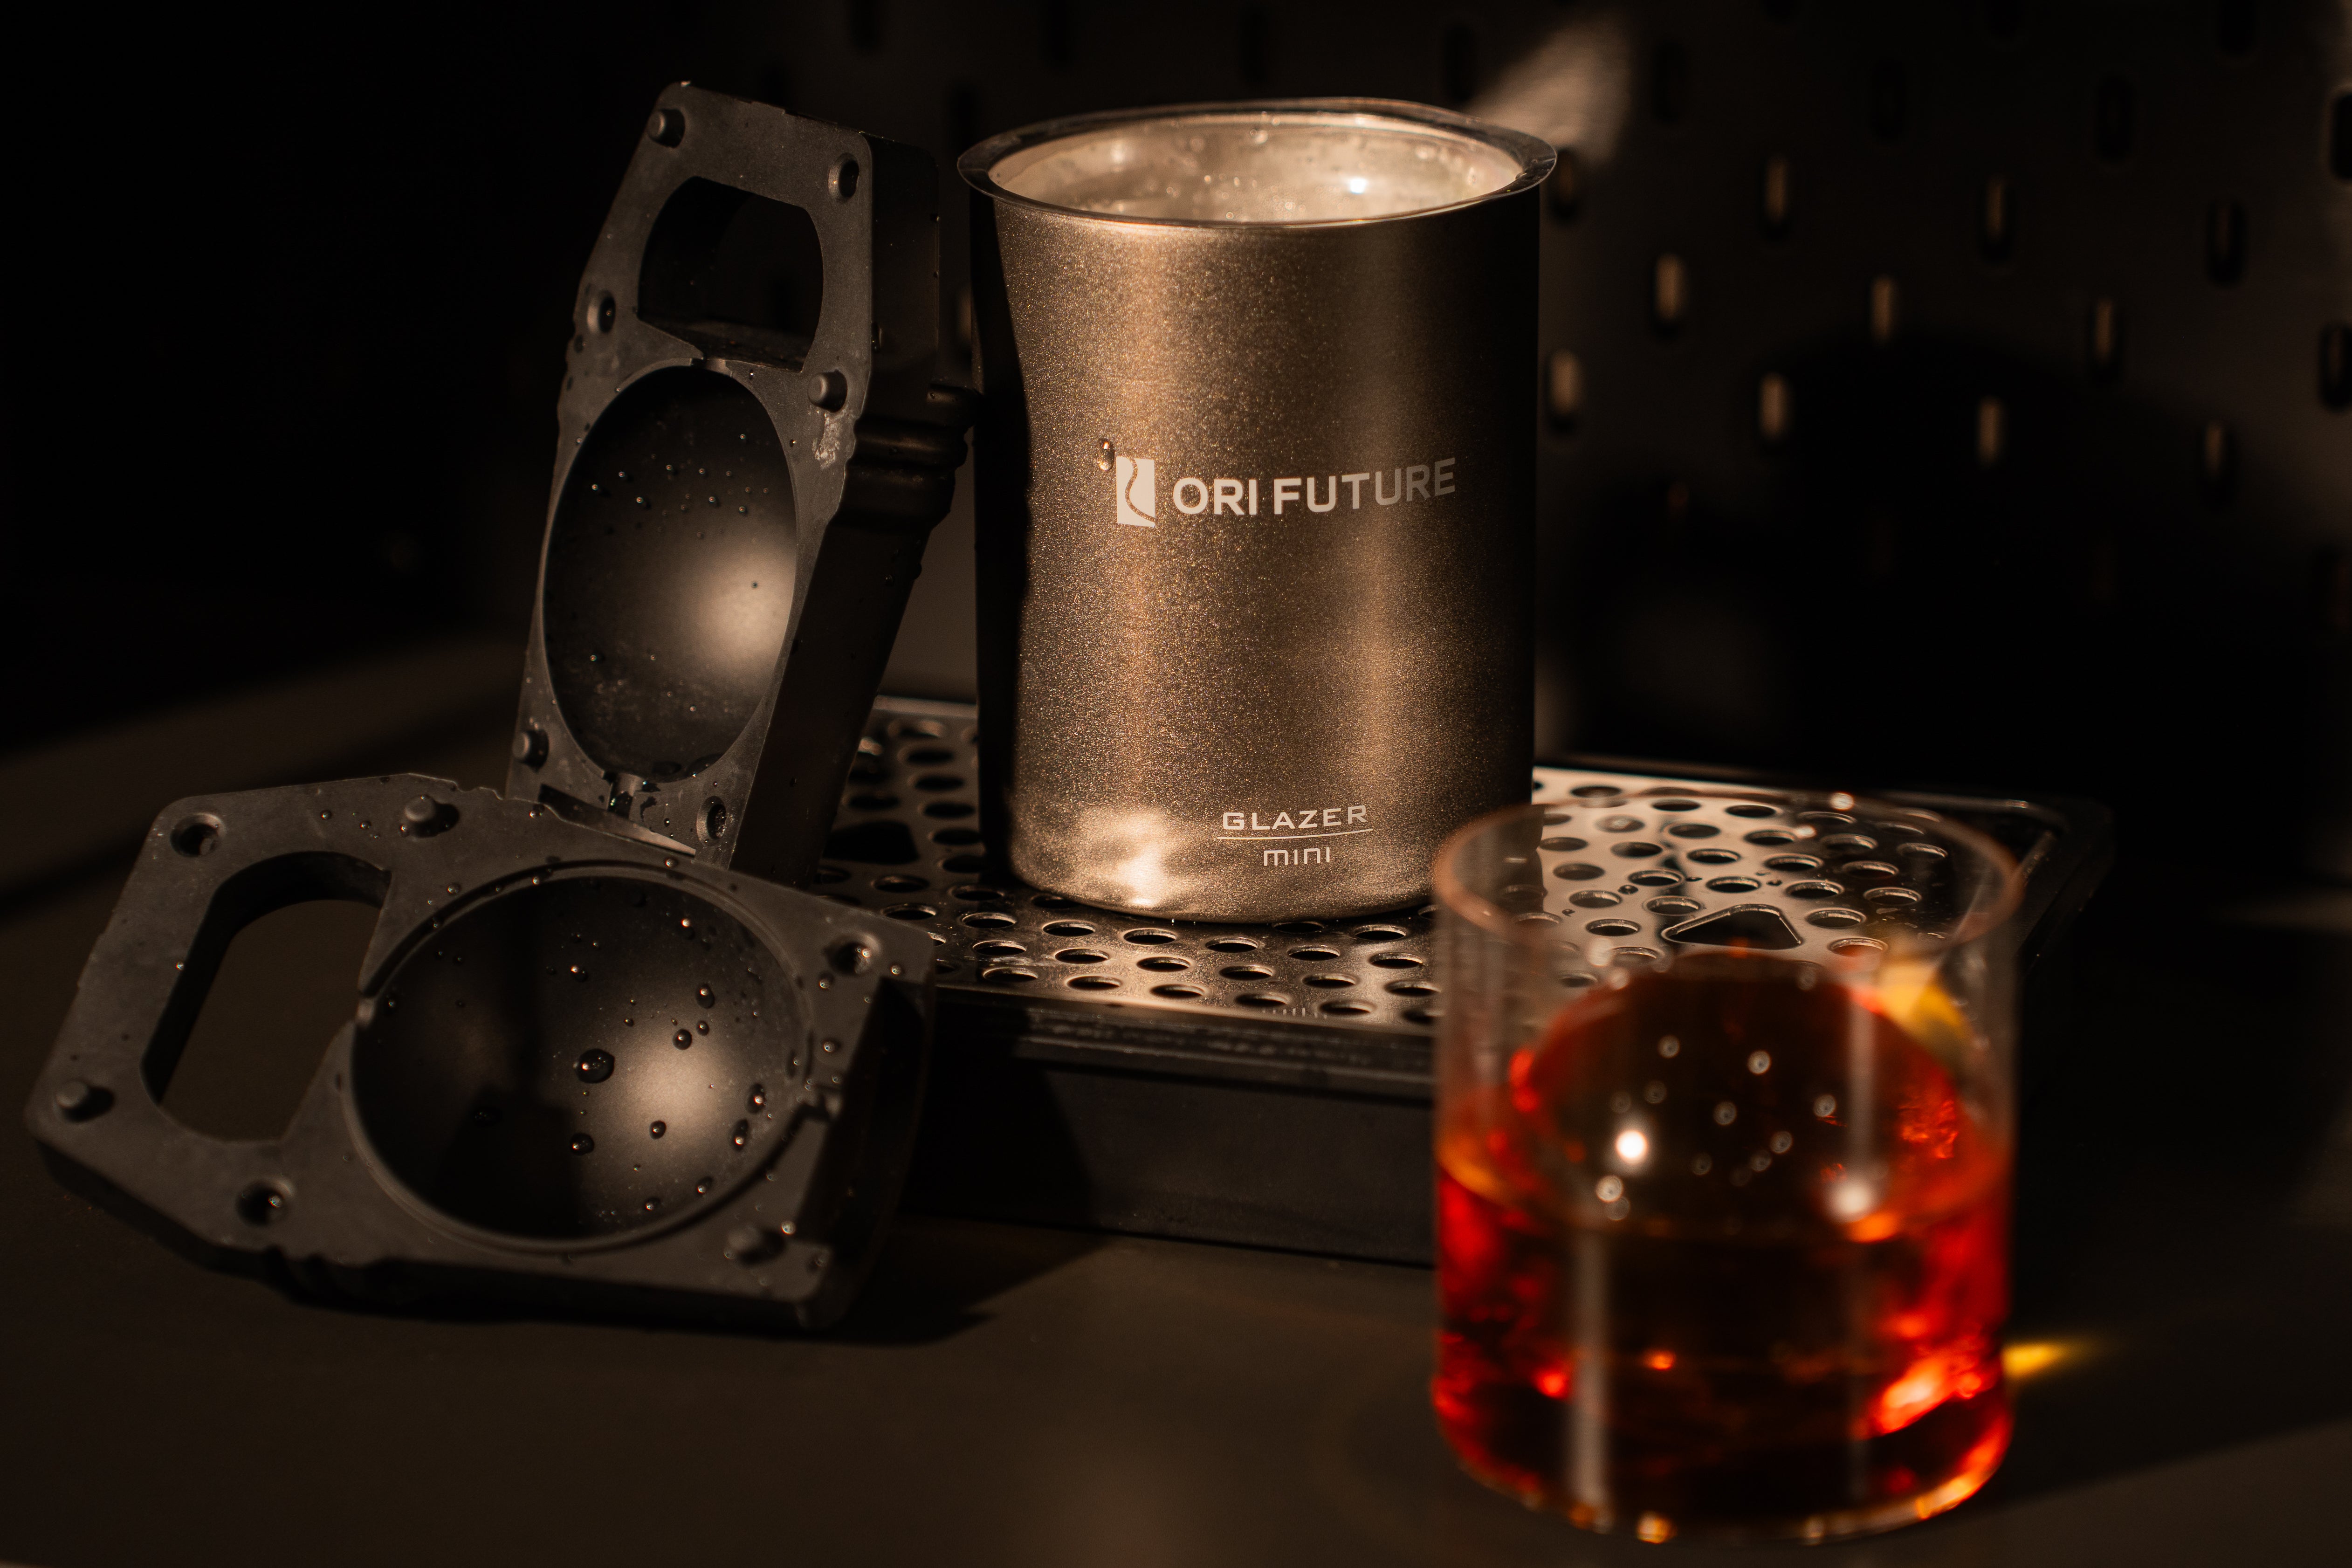
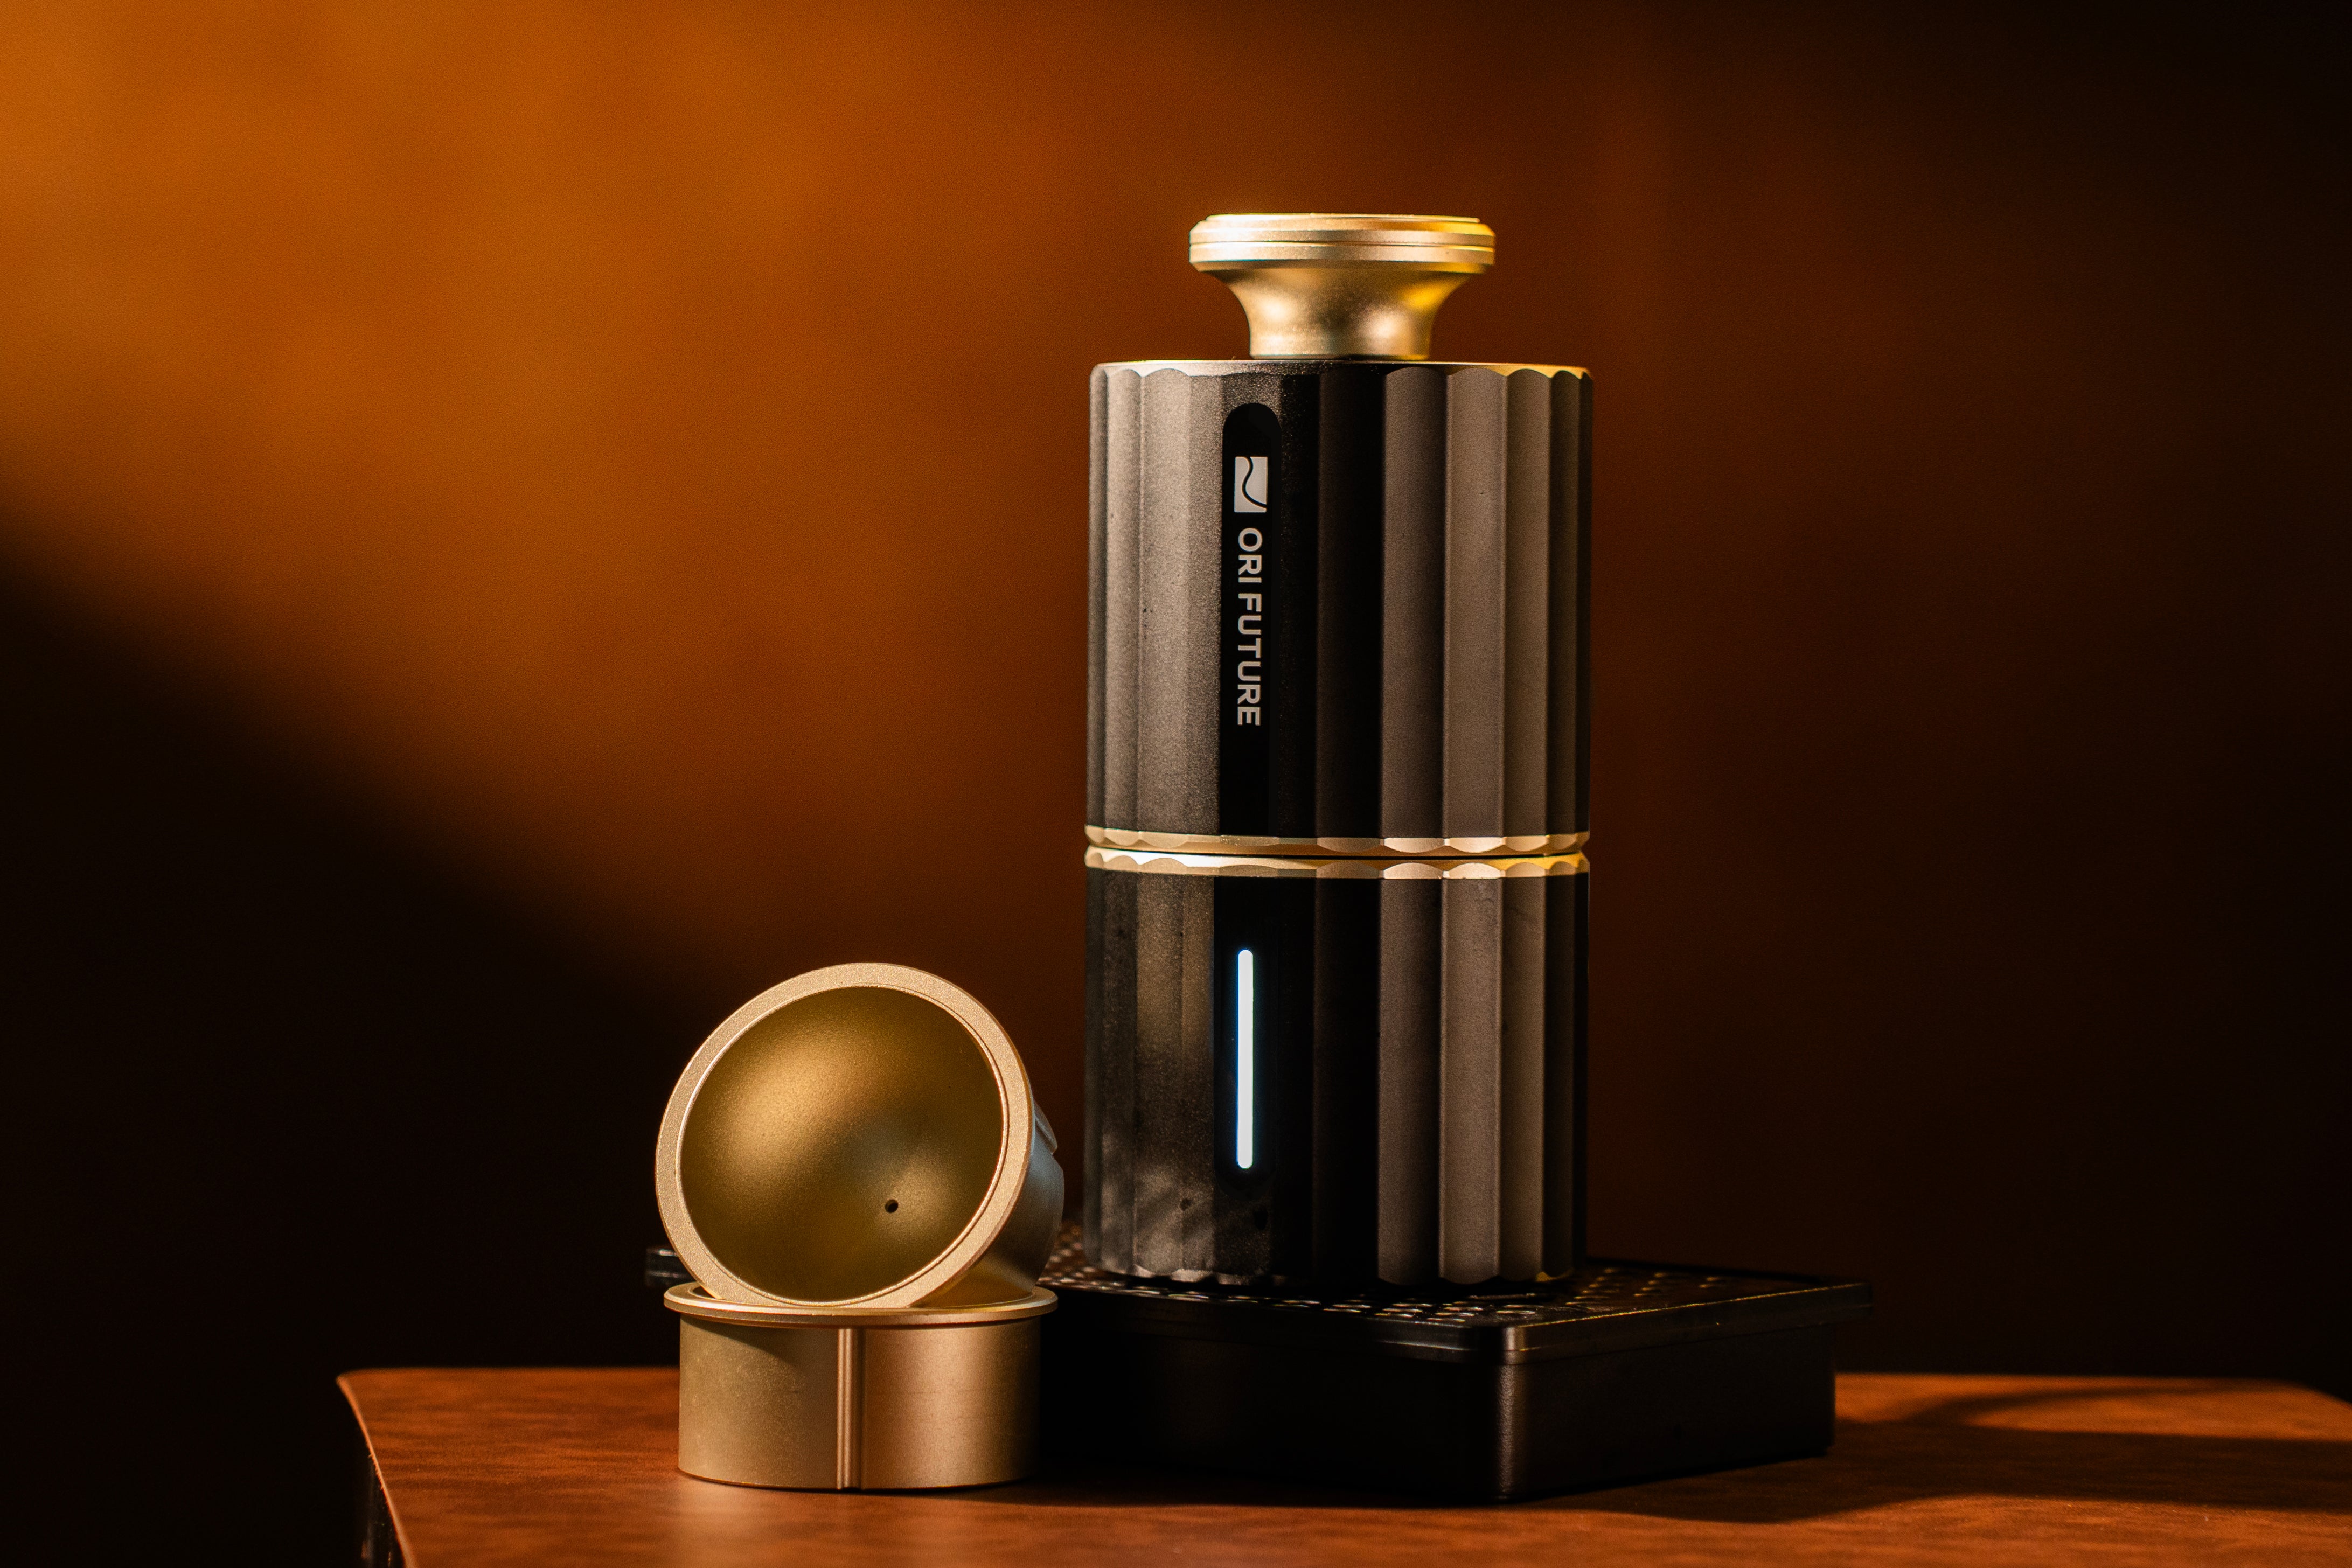
The third prototype continues the exterior design style of the second, using metallic materials complemented by a blend of black and gold. This design choice showcases the product's high-end quality and offers users a visually luxurious experience. The outer shell is made of metal to enhance the coolness of the product, which is well-reflected when it is working.
Angular Design
The simple angular design makes the upper part easy to lay flat, providing a more reassuring user experience. This design not only highlights the overall simplicity of the product but also enhances its practicality.
Body Proportion
We also made multiple adjustments to the proportions of GLAZER Press to ensure a more coordinated appearance. Each adjustment underwent meticulous calculation and evaluation to ensure that the final product appearance perfectly aligns with our design standards.
Serendipitous Resemblance
The cylindrical body design exudes a warm and full-bodied feel while maintaining stability, making it a standout decoration on any dining table. Whether it's a family gathering or a business meeting, this product adds a unique atmosphere and style to any setting. In the exterior design, we noticed its unexpected resemblance to the shape of a Yamazaki whisky bottle, adding an unexpected charm to the GLAZER Press.
GLAZER Press Processing
After we completed the update of the industrial design, we immediately started the stacking design of the internal structure and the selection of the molding process and materials of the exterior parts. This was a big systematic project. Due to limited space, we would like to focus on sharing the following interesting things with you, so that everyone can have a better understanding of the development process of GLAZER Press.
- Product shell
- Handle
- Rotary Switch Button
The first is its shell. The aluminum alloy shell adopts a one-piece design. For this purpose, we used a special metal mold when conducting PVT test production. The picture below shows the blank we produced through the mold. Next, we need to cut it into the corresponding length, and use a high-precision composite lathe for surface precision processing, so as to ensure the sealing effect. In order to ensure product quality and cost, we must ensure that every process is worthwhile and efficient.

Once the cutting was complete, we had a batch of original shell parts waiting to be surfaced. As shown below:

In order to ensure GLAZER Press remains consistent with the original design as much as possible, after contacting with professional surface treatment suppliers, we finally chose aluminum alloy anodizing treatment after conducting some sample testings.
Handle Design
Considering the production cost, we deleted some features of the design. Although this will make the designer unhappy, such things will always happen (I mean: conflicts between manufacturing engineers and industrial designers). The solution is to compromise and find a middle ground.
In the original design, there are many stripes on the handle. These vertical stripes echo the stripes on the shell, which will increase the integrity and consistency of the product. Inevitably, such a design would make it difficult to produce. On the contrary, if there are no "stripes", the processing difficulty will be greatly reduced, which also means a reduction in cost, so we chose to delete these "stripes".
In terms of materials, we also made some comparisons. The plastic (PA66) + electroplating process can achieve the appearance effect, but compared to aluminum alloy, the touch feel seems to be worse. So we finally chose to use all aluminum alloy to make the handles.

Switch Button
Regarding the switch design of GLAZER Press, this is a place worth introducing. We hope that through the introduction of the R&D journey, we can help our readers understand the story between GLAZER Press and us more comprehensively. So, if you have any good suggestions, please let us know in the comments below.
In the initial design, GLAZER Press did not have any switches. It was envisioned to reduce the user's difficulty of use by using multi-sensor fusion, which would make it more intelligent. However, we ignored the difficulty of integrating complex systems and the safety risks behind such a design. After many "minimum viable solution verifications", we decided to add a switch and leave the choice of whether to heat the product to our user.
At this time, how to design the switch becomes a problem again. From an engineering perspective, the simplest way is to add a red boat-shaped switch under the power cord, just like most home appliances you see.

But such a design would destroy the appearance consistency of the product. After discussions between industrial designers and structural engineers, we came up with a new idea to combine the switch and the handle, thus retaining the switch without modifying the appearance.

We designed an elastic wave bead inside the handle to give it a certain pressing stroke. The user can trigger the switch by pressing the handle. Long press and short press correspond to different functions, and the user can flexibly operate the machine on and off.
Product Proofing
The journey from the inception of an idea for a consumer-grade smart hardware product to its delivery into the hands of users is often a long one. Having completed the design phase in our laboratory and selected materials and processing methods from our suppliers, we now face the final step: reliability and longevity testing of the product.
At times, we cannot fully trust the raw material suppliers. They may not be entirely aware of the quality of the products they sell but they often assure their customers of their reliability. Experience has shown that excessive reliance on supplier assurances can lead to significant issues when the product is used by consumers. Consequently, we have decided to conduct separate reliability tests on the critical heating elements of our ice crushers.
In our designed tests, we must simulate more severe conditions than the product would typically encounter. For selecting key experimental parameters, we analyze real user data and apply a safety factor based on this analysis. For example, an average user might use the heating element 3–4 times a day, with each use lasting about 2 minutes. Assuming this product is essential and frequently used, we estimate daily use at once a day, translating to 2920 minutes of use per year.
To ensure a minimum product lifespan of three years, the heating elements must withstand at least 8760 minutes (146 hours) of operation. With a safety factor of 1.5, the heating elements tested in our lab must endure at least 219 hours of operation.

Metal parts are still processed in batches using CNC machining centres. After processing, surface treatment is performed, and assembly is finally completed. Additionally, various ice inserts are processed through CNC machining centres as well.

Although the GLAZER Press looks very small and can be picked up with only one hand, its production is challenging. The product consists of 51 parts and a total of 138 parts. The production capacity will be lower if a fully automatic or semi-automatic assembly line is not used. Don’t worry; we have teamed up with an excellent team from the former DJI NPI department to help us push the product to mass production, and we are in the process of trial production.

Although some problems still need to be solved and optimized, this small batch trial production succeeded overall. Shortly, this product will appear on a real production line.
Reliability Test for Final GLAZER Press
#1: Especially for Shipping
The journey from the inception of an idea for a consumer-grade smart hardware product to its delivery into the hands of users is often a long one. Having completed the design phase in our laboratory and selected materials and processing methods from our suppliers, we now face the final step: reliability and longevity testing of the product.
At times, we cannot fully trust the raw material suppliers. They may not be entirely aware of the quality of the products they sell but they often assure their customers of their reliability. Experience has shown that excessive reliance on supplier assurances can lead to significant issues when the product is used by consumers. Consequently, we have decided to conduct separate reliability tests on the critical heating elements of our ice crushers.
In our designed tests, we must simulate more severe conditions than the product would typically encounter. For selecting key experimental parameters, we analyze real user data and apply a safety factor based on this analysis. For example, an average user might use the heating element 3–4 times a day, with each use lasting about 2 minutes. Assuming this product is essential and frequently used, we estimate daily use at once a day, translating to 2920 minutes of use per year.
To ensure a minimum product lifespan of three years, the heating elements must withstand at least 8760 minutes (146 hours) of operation. With a safety factor of 1.5, the heating elements tested in our lab must endure at least 219 hours of operation.

Beyond individual component reliability tests, we also consider the effects of the usage environment and transportation on the entire product. Thus, we conduct several essential tests:
1. Salt Spray Test: This test assesses the corrosion resistance of products or metal materials by simulating a salt spray environment using specialized equipment. We use a 5% NaCl solution as the test reagent, maintaining the environmental temperature at 35°C (±2°C) and humidity at around 75%, for a duration of 48 hours.

2. Simulated Transportation Vibration Test: Vibration is a major component of transportation packaging tests. During transportation, products may experience surface scratches, paint or coating removal, and internal component issues like loose screws, deformation, cracks, breakages, or detachment. We conduct simulated transportation vibration tests to address these potential problems.

3. Simulated Transportation Drop Test: Since our customers are worldwide, products often undergo multiple stages of transportation, during which they might be bumped or dropped. To evaluate the structural reliability of our products and the protective effectiveness of their packaging, we perform drop tests based on international standards.

4. High and Low Temperature Tests: Considering environmental differences in various regions—some with high temperatures, others with low—we conduct rigorous environmental tests to ensure the safety and reliability of our products for all users. This includes tests for high-temperature operation, low-temperature operation, high-temperature storage, and low-temperature storage.

These comprehensive reliability tests are critical to ensuring our products' quality and durability.
To achieve this, we used all-metal materials to ensure a refined tactile experience. Simultaneously, we strategically reduced the weight of non-supported internal components to improve comfort and ease of operation.


In our metal fabrication process, we utilize metal extrusion for the housing and CNC machining for both inserts and heat transfer components. Furthermore, we employ various techniques, including grinding, sandblasting, ultrasonic cleaning, PVD (Physical Vapor Deposition), and hard oxidation for surface treatment, ensuring that the texture of GLAZER Press meets and exceeds both your and our expectations.
 TimeLine

- June 09, 2023 Key Component Verification
- June 18, 2023 3D Print Verification
- July 1, 2023 The First Prototype (MVP)
- July 5,2023 Product Reliability Testing of Ice Pressing
- August 2, 2023 The Second Prototype with Design
- September 20, 2023 Ice Inserts Designing, Manufacturing and Inspiration
- October 12, 2023 The Modification of Second Prototype (Milestone)
- November 15th, 2023 Industrial Design plug in
- Dec 15, 2023 GLAZER Press Processing
- January 17th, 2024 Product Proofing
- May 16th, 2024 Reliability Test for Final GLAZER Press #1: Especially for Shipping
- June 27, 2024 A brief introduction for the born of GLAZER Press